
Dr. Satoko Matsumura, DDS, PhD, MDS
Associate Professor of Dental Medicine at the Columbia University Irving Medical Center in the Division of Oral and Maxillofacial Radiology
Dr. Matsumura teaches Radiation Physics, Radiation Biology, Interpretation, and Image acquisition to the second, third, and fourth-year dental students; the course enrolls about 100 students each year. She also trains dental assistants, dental hygienists, radiology technologists, and residents based on ALARA (as low as reasonably achievable) concept following NYS, ADA, AAOMR, and NCRP guidelines. With the shift to remote teaching in Spring 2020, Dr. Matsumura had to adapt a typically in-person training experience around image acquisition to meet a fully remote teaching environment. Dr. Matsumura met the moment by partnering with colleagues to leverage asynchronous learning opportunities. Read on to learn more about what Dr. Matsumura did in her course, what lessons and experiences she’s carrying forward, and the advice she has for other instructors at Columbia.
Partner with Colleagues to Leverage Asynchronous Learning Opportunities
In the in-person portion of this course, we use a mannequin for 2-dimensional (2D) radiographs in the clinic. However, there is no suitable mannequin for practicing cone beam CT, which is currently widely used in the dental field and has a higher radiation dose for patients. Prior to scanning the patient for a cone beam CT, we need to take two 2D radiographs from the front and side to target the area of interest three dimensionally. Although there are two 2D radiographs, some students have difficulty imagining the target area and may end up with the need to re-scan the patient.
To solve the issue of practicing cone beam CT, I worked with Professor Steven Feiner and his master’s students in the Department of Computer Science to develop a smartphone/computer training application to simulate cone beam CT image acquisition (see Figures A, B, and C). Professor Feiner has been collaborating with the Dental School for several years and was looking for a project using virtual reality (VR) for clinical use. The radiology clinic uses x-rays, and I have always been concerned with radiation exposure for our patients, especially when we retake the scan. Children are especially more radiation-sensitive than adults, and they hardly stay still without any movement during the scan. There is always a dilemma of scanning the patients accurately and improving our skills by practicing scanning many cases, and I thought that practicing with VR would ensure improving our scanning skills without any health risks.
The benefits of the training application are that there is no radiation exposure involved and no need to use the CT unit; you can practice at home. While this project was started prior to the pandemic, there was the added benefit of asynchronous training at a time when proximity between instructor and student was discouraged to prevent the transmission of Covid-19.
Additionally, if English was not the primary language of the faculty member, like myself, teaching and learning remotely/asynchronously proved to be beneficial because students could use the training application at their own pace and repeat it as many times as needed. I had feedback that remote learning would be better than in-person lectures in class from non-native speakers. Thus, post-pandemic, this instructional model will continue to be used.
Advice for Instructors and the Future of Teaching at Columbia
Create Opportunities for Asynchronous Learning.
Asynchronous teaching should be easy to understand, easy to access, and be able to be used everywhere, but it should be followed by synchronous engagement to confirm whether students and staff understand correctly. To enhance students’ learning, developing new devices should be one of the key projects in the future. We welcome feedback on how comfortable students are with asynchronous learning and work together to improve the learning process.
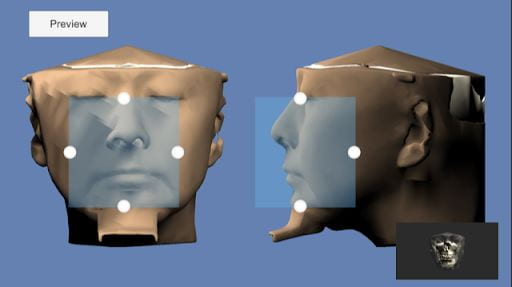
Figure A shows the preview of a cone beam CT image acquisition of patient-face examples from the front and side. The small blue square is the target area of the scan. For example, the target here is the maxillary and mandibular arches with the maxillary sinus, avoiding the c-spine and eyes. Using the four white dots, students can make the square larger or smaller, moving to the right and left, up and down. The right lower panel shows the resultant scan. Students can practice manipulating the target area and comparing it with the expected scan before the actual scanning.
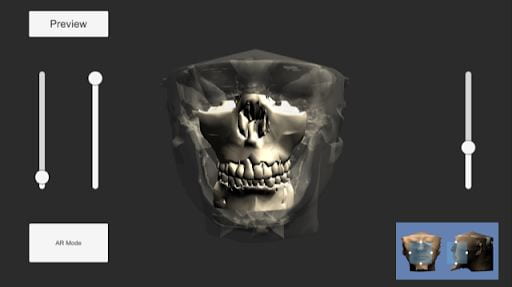
Figure B
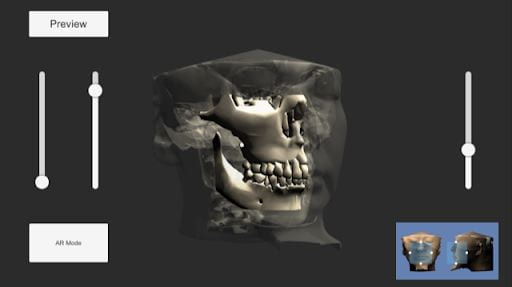
Figure C
Figures B and C show the expected 3D scan based on the preview that students worked with; now the face previews move to the right lower panel. The scan is 3D with VR, so students can turn the image around (Figure C) to confirm all of the anatomical structures involved. Students can always go back to the preview with the blue square to correct the target area as many times as they need.